什么是SpringMVC?
Spring MVC 随着Spring3.0 的发布已经成为一个最优秀Spring 的MVC框架,特点有 MVC 设计模型、请求驱动类型的 轻量级 web框架
Spring 提供的 监听器 ContextLoaderListener 做了什么
加载Spring配置文件、创建应用上下文对象并存储到ServletConttext域中,提供了一个客户端工具 WebApplicationContextUtils 获得 应用上下文对象
我们如何使用?
- 在web.xml配置 ContexLoaderListener 监听器(Spring-web坐标)
- 使用WebApplicationContextUtils 获得应用上下文对象 ApplicaitonContext
SpringMVC 开发步骤
切记 使用SpringMVC开发时,使用依赖 请统一版本,跨版本,你就等着报错吧!!!
切记 使用SpringMVC开发时,使用依赖 请统一版本,跨版本,你就等着报错吧!!!
切记 使用SpringMVC开发时,使用依赖 请统一版本,跨版本,你就等着报错吧!!!
- 1、导包 SpringMVC包
- 2、配置Servlet 核心前端控制器 DispathcerServlet
- 3、编写Controller 和 视图页面
- 4、将Controller 使用注解@Controller 配置到Spring 容器中
- 5、开启组件扫描 放到 spinrg-mvc.xml
- 6、测试
    <dependency>
      <groupId>org.springframework</groupId>
      <artifactId>spring-webmvc</artifactId>
      <version>5.0.5.RELEASE</version>
    </dependency>
applicationContext.xml
<?xml version="1.0" encoding="UTF-8"?>
<beans xmlns="http://www.springframework.org/schema/beans"
       xmlns:context="http://www.springframework.org/schema/context"
       xmlns:xsi="http://www.w3.org/2001/XMLSchema-instance"
       xsi:schemaLocation="http://www.springframework.org/schema/beans http://www.springframework.org/schema/beans/spring-beans.xsd http://www.springframework.org/schema/context http://www.springframework.org/schema/context/spring-context.xsd">

    <!-- 使用注解开发,需要配置组件扫描 这样 Spring就能知道被注解修饰的内容-->
    <context:component-scan base-package="com.zlk"/>
</beans>
spring-mvc.xml
<?xml version="1.0" encoding="UTF-8"?>
<beans xmlns="http://www.springframework.org/schema/beans"
       xmlns:xsi="http://www.w3.org/2001/XMLSchema-instance"
       xmlns:context="http://www.springframework.org/schema/context"
       xsi:schemaLocation="http://www.springframework.org/schema/beans http://www.springframework.org/schema/beans/spring-beans.xsd http://www.springframework.org/schema/context https://www.springframework.org/schema/context/spring-context.xsd">

    <!-- 组建扫描 -->
    <context:component-scan base-package="com.zlk"/>

</beans>
web.xml
<!DOCTYPE web-app PUBLIC
 "-//Sun Microsystems, Inc.//DTD Web Application 2.3//EN"
 "http://java.sun.com/dtd/web-app_2_3.dtd" >

<web-app>
  <display-name>Archetype Created Web Application</display-name>


  <!-- 初始化全局参数 -->
  <context-param>
    <param-name>contextConfigLocation</param-name>
    <param-value>classpath:applicationContext.xml</param-value>
  </context-param>
  <!-- 配置监听器 -->
  <listener>
    <listener-class>org.springframework.web.context.ContextLoaderListener</listener-class>
  </listener>

  <!--配置SpirngMVC 的前端控制器-->
  <servlet>
    <servlet-name>DispathcerServlet</servlet-name>
    <servlet-class>org.springframework.web.servlet.DispatcherServlet</servlet-class>
    <init-param>
      <param-name>contextConfigLocation</param-name>
      <param-value>classpath:spring-mvc.xml</param-value>
    </init-param>
    <load-on-startup>1</load-on-startup>
  </servlet>
  <servlet-mapping>
    <servlet-name>DispathcerServlet</servlet-name>
    <url-pattern>/</url-pattern>
  </servlet-mapping>

</web-app>
自己随便写一个Controller层 写一个 RequestMapping() 即可
然后 自己测试,看看能不能调到 webapp 文件下的网页 即可
SpringMVC 执行流程 (手写)
首先要知道 组件
DispatcherServlet 前端控制器
HandlerMapping 处理器映射器
HandlerAdaptor 处理器 适配器
ViewResolver 视图解析器
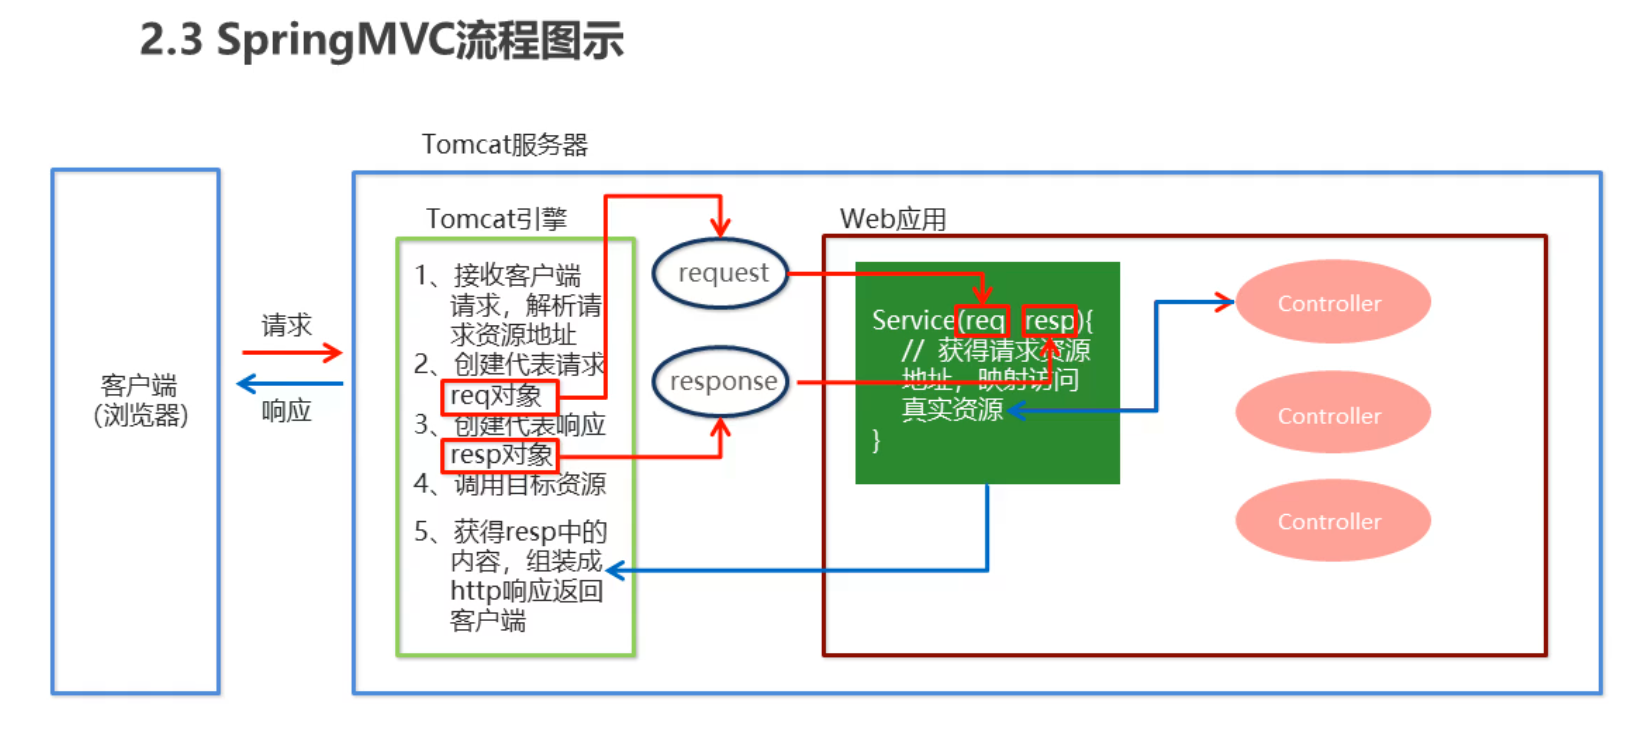
- 用户发送请求 到DispatcherServlet
- DispatcherServlet前端控制器 接受请求 去调用 HandlerMapping 处理器映射器
- 处理器映射器找到具体的处理器(根据XML、或者注解)生成处理器对象,以及拦截器(如果有则生成没有就不生成) 一并返回给 DispatcherServlet前端控制器
- DispatcherServlet前端控制器 去 调用 HandlerAdaptor处理器适配器
- HandlerAdaptor处理器适配器 去调用具体的处理器 (Controller 也叫后端控制器)
- Controller 执行完成返回 ModelAndView。
- HandlerAdaptor处理器适配器 将后端控制器返回的 ModleAndView 返回给 DispatcherServlet前端控制器
- DispatcherServlet 将ModleAndViewer 传递给 ViewReslover视图解析器
- ViewReslover 解析后 返回DispatcherServlet 具体的View
- DispatcherServlet 根据View 进行渲染视图。并返还给用户。
SpringMVC 常见注解
@RequestMapping :用于建立请求URL与请求执行方法的对应关系
参数Method = "" ,可以选择 枚举形式RequestMethod.GET
配置内部资源视图解析器
spring-mvc.xml 添加下面配置
    <!-- 配置内部资源视图解析器 -->
    <bean id="viewResolver" class="org.springframework.web.servlet.view.InternalResourceViewResolver">
        <property name="prefix" value="/jsp/"></property>
        <property name="suffix" value=".jsp"></property>
    </bean>
特殊说明:
上述文章均是作者实际操作后产出。烦请各位,请勿直接盗用!转载记得标注原文链接:www.zanglikun.com
第三方平台不会及时更新本文最新内容。如果发现本文资料不全,可访问本人的Java博客搜索:标题关键字。以获取最新全部资料 ❤
免责声明: 本站文章旨在总结学习互联网技术过程中的经验与见解。任何人不得将其用于违法或违规活动!所有违规内容均由个人自行承担,与作者无关。
第三方平台不会及时更新本文最新内容。如果发现本文资料不全,可访问本人的Java博客搜索:标题关键字。以获取最新全部资料 ❤
免责声明: 本站文章旨在总结学习互联网技术过程中的经验与见解。任何人不得将其用于违法或违规活动!所有违规内容均由个人自行承担,与作者无关。
评论(0)