

分享一下openresty比较好的教程,里面有nginx、lua、openresty调优的教程:https://moonbingbing.gitbooks.io/openresty-best-practices/content/
如果OpenResty 已经安装,OpenResty 有自带的 nginx
OpenResty 介绍
网站:https://openresty.org/cn/download.html
是一个基于 NGINX 的可伸缩的 Web 平台,由中国人章亦春发起,提供了很多高质量的第三方模块。
OpenResty 是一个强大的 Web 应用服务器,Web 开发人员可以使用 Lua 脚本语言调动 Nginx 支持的各种 C 以及 Lua 模块,更主要的是在性能方面,OpenResty可以 快速构造出足以胜任 10K 以上并发连接响应的超高性能 Web 应用系统。
360,UPYUN,阿里云,新浪,腾讯网,去哪儿网,酷狗音乐等都是 OpenResty 的深度用户。
OpenResty 安装
OpenResty 依赖库有: perl 5.6.1+, libreadline, libpcre, libssl。
安装一些环境
yum install readline-devel pcre-devel openssl-devel我们可以去官网下载好 https://openresty.org/cn/
我先进入/home 文件夹 在下载
cd /home

wget https://openresty.org/download/ngx_openresty-1.9.7.1.tar.gz   # 下载
解压
# 解压
tar xzvf ngx_openresty-1.9.7.1.tar.gz
进入文件夹
cd ngx_openresty-1.9.7.1配置
./configuremake
make安装
make install安装的位置
> whereis openresty
openresty: /usr/bin/openresty /etc/openresty /usr/local/openresty
# 我们主要关注/usr/bin/openresty
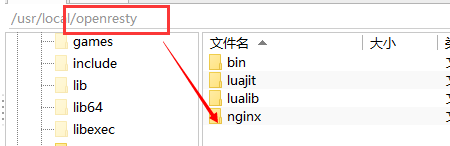
其主要目录如下:
/usr/local/openresty$ ll
total 40
drwxr-xr-x 10 root root 4096 Aug 12 17:28 ./
drwxr-xr-x 11 root root 4096 Aug 12 17:28 ../
drwxr-xr-x 2 root root 4096 Aug 12 17:28 bin/
drwxr-xr-x 6 root root 4096 Aug 12 17:28 luajit/
drwxr-xr-x 5 root root 4096 Aug 12 17:28 lualib/
drwxr-xr-x 11 root root 4096 Aug 12 17:28 nginx/
drwxr-xr-x 4 root root 4096 Aug 12 17:28 openssl111/
drwxr-xr-x 3 root root 4096 Aug 12 17:28 pcre/
drwxr-xr-x 5 root root 4096 Aug 12 17:28 site/
drwxr-xr-x 3 root root 4096 Aug 12 17:28 zlib/安装成功 使用
创建一个文件夹 /www
mkdir /www然后进入 www 文件夹 并一次性创建 2个 文件夹 一个是logs 一个是conf
cd www

mkdir logs/ conf/
我们logs 用于存放日志,而 conf 是我们存放配置文件
进入 conf 并创建 一个nginx.conf的文件
cd conf/

touch nginx.conf
存放代码如下
worker_processes  1;
error_log logs/error.log;
events {
    worker_connections 1024;
}
http {
    server {
        listen 9000;
        location / {
            default_type text/html;
            content_by_lua '
                ngx.say("<p>Hello, World!</p>")
            ';
        }
    }
}
开放 9000 端口 重启防火墙
#如果你的linux系统没有firewall-cmd 你可以安装一下
sudo apt install firewalld

# 放行9000端口
firewall-cmd --zone=public --add-port=9000/tcp --permanent

# 重启防火墙,使得刚才配置防火墙生效
firewall-cmd --reload
启动 openresty
进入 我们创建的/www文件夹
cd /www
# 启动openresty
/usr/local/openresty/nginx/sbin/nginx -p `pwd`/ -c conf/nginx.conf
# 重载配置文件,注意,自己指定的nginx一定要-p指定 nginx的目录!
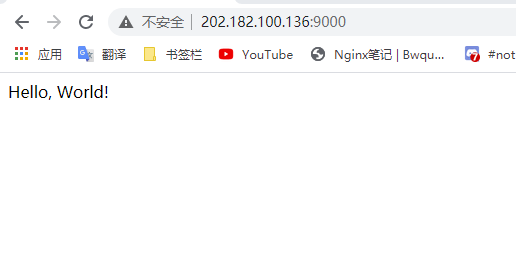
sudo /usr/local/openresty/nginx/sbin/nginx -p `pwd`/ -c conf/nginx.conf -s reload启动成功不会有提示

直接访问 ip:9000 即可
具体用法 --> 缓存预热 与 二级缓存查询
缓存预热
上文描述的是:访问9000端口,页面展示hello world。
我们现在需要做的是:请求方法进入lua文件,然后返回值由lua return决定
1、nginx.conf文件引用lua、c的功能,相当于开启lua
在http块下面引入下文

    # 加载lua模块
    lua_package_path "/usr/local/openresty/lualib/?.lua;;";
    # 加载c模块
    lua_package_cpath "/usr/local/openresty/lualib/?.so;;";
当前配置文件变成了
worker_processes  1;
error_log logs/error.log;
events {
    worker_connections 1024;
}
http {

    # 加载lua模块
    lua_package_path "/usr/local/openresty/lualib/?.lua;;";
    # 加载c模块
    lua_package_cpath "/usr/local/openresty/lualib/?.so;;";

    server {
        listen 9000;
        location / {
            default_type text/html;
            content_by_lua '
                ngx.say("<p>Hello, World! Has already add lua and c model!</p>")
            ';
        }
    }
}
重启测试一下:看看我们Hello World变成:Has already add lua and c model! 如果变成了,说明我们的nginx配置是OK的!加载lua、c模块配置完成!
她奶奶滴,我无法重新加载新的配置文件,怎么搞都不行,最后直接ps -ef | grep nginx 然后kill -9 nginx的进程号解决的!
原来是我自己的问题,我们使用命令openrestry启动的nginx时指定新的配置文件,就会导致新的nginx是一个新的进程,原来的nginx默认程序执行原来进程的重载、停止就肯定不对,所以我们要还原原来的命令,然后再拼接 -s reload
# 理论是可以重置配置文件的。
sudo /usr/local/openresty/nginx/sbin/nginx -s reload

但是,上述命令我们指定了配置文件的 -p,所以nginx启动的进程就是新的nginx进程了,所以上述命令不可用 必须还原-p 才可以
sudo /usr/local/openresty/nginx/sbin/nginx -p /www -c conf/nginx.conf -s reload
或
sudo /usr/local/openresty/nginx/sbin/nginx -p /www/ -c conf/nginx.conf -s reload
都可以
-p 似乎指定nginx安装目录(反正就是一个目录,有没有真安装无所谓),以此来判定未来启动新的nginx进程!可不是-p的内容加上-c的路径确定一个配置文件!
2、具体业务配置 nginx配置请求的处理
worker_processes 1;
error_log logs/error.log;
events {
worker_connections 1024;
}
http {
# 加载lua模块
lua_package_path "/usr/local/openresty/lualib/?.lua;;";
# 加载c模块
lua_package_cpath "/usr/local/openresty/lualib/?.so;;";
server {
listen 9000;
location / {
default_type text/html;
content_by_lua '
ngx.say("<p>Hello, World! Has already add lua and c model!</p>")
';
}
location /abc {
# default_type text/html;
default_type application/json;
content_by_lua_file lua/a.lua;
}
}
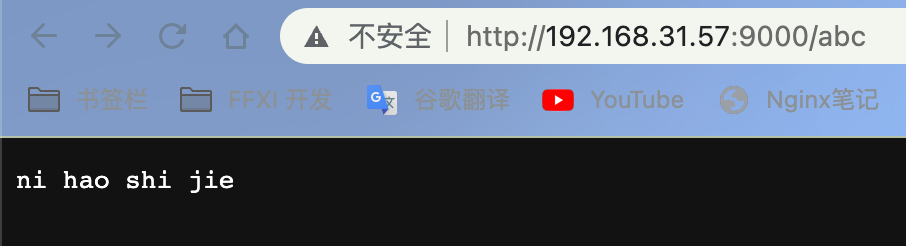
}创建文件夹lua后并创建a.lua
ngx.say("ni hao shi jie")浏览器访问 xxx.xxx.xxx.xxx:9000/abc 就会出现
此时,我们的初级openresty执行lua脚本就完成了!
第三方平台不会及时更新本文最新内容。如果发现本文资料不全,可访问本人的Java博客搜索:标题关键字。以获取最新全部资料 ❤
免责声明: 本站文章旨在总结学习互联网技术过程中的经验与见解。任何人不得将其用于违法或违规活动!所有违规内容均由个人自行承担,与作者无关。
评论(0)